Monday, April 11, 2022

Use Touch ID on your MacBook Air M1

It's been nearly a year since Certified staff swapped their old MacBook Air laptops for the new MacBook Air M1. Many of the features of our new computers were a significant upgrade over the older models. From the faster processor and sharper screen, to the extended battery life, there is much to love. But one of the best features of the latest MacBook is Touch ID. Now, by simply placing your finger on the Touch ID button, you can unlock your Mac and do so much more.

The video below explains how to setup Touch ID, how to add additional fingers to Touch ID, how to use it make purchases, and autofill passwords in Safari.


Prior to Touch ID people may have been hesitant to lock their computers when putting them to sleep because they didn't want the inconvenience of having to put in their password to unlock it. Touch ID can eliminate that and help to ensure that your information is kept secure. Here's how you can require a password or Touch ID after waking your Mac.

On your Mac, choose Apple menu > System Preferences, click Security & Privacy , then click General.

Select Require password… after sleep or screen saver begins.

Click the pop-up menu and choose the time that passes before a password is required.

Then, when you wake your computer you can either enter your password or use Touch ID to unlock it.

Year-End Translation/Interpretation Requests

As the year draws to a close and calendars start to fill up, I'd like to remind everyone to submit their translation/interpretation requests as soon as possible. Please make sure to secure an interpreter in a timely fashion for those important year-end meetings.

You can submit a translation/interpreter request using our Google Form which can be accessed by either clicking here or by visiting the Barrington 220 website, clicking the Staff tab (login required), and clicking Translation/Interpretation Request

We ask that you keep the following in mind before submitting your request: 
  • Please allow a minimum of 5–10 business days for written translation requests to be returned, this can take longer, especially during this season. 
  • If possible, please submit your meeting interpreter request 15 days in advance (minimum) in order to secure an interpreter. 
Our team would be happy to assist with your requests!

If you have any questions or concerns, please contact me, Hector Ontiveros, at hontiveros@barrington220.org or 847.842.3561

Try Keynote's Live Video Feature

At an Apple event last fall, new versions of the iPhone, iPad, and MacBook grabbed the headlines. But Apple also announced new features for their existing software that didn’t get the same widespread attention.

One such feature was the addition of a live video option in Keynote. Keynote version 11.2 allows users to embed a live video feed directly into a Keynote presentation. Keynote recognizes this as an object, allowing the user to change the shape, size, and position of the video, as well as use animation features like Magic Move.

Insert a Live Video Feed into a Keynote Presentation in macOS

1. Open a Keynote presentation.

2. Tap Media in the toolbar.

3. Select Live Video from the dropdown menu.

4. Move, resize, and change the shape of the video box to fit your preferences.


Insert a Live Video Feed into a Keynote Presentation Using iPadOS

1. Open a Keynote presentation.

2. Tap the plus button (+) in the toolbar.

3. Select Live Video from the menu.

4. Move, resize, and change the shape of the video box to fit your preferences.

The live video feed will only appear on the slides on which you place it. This allows you to have it when you need it, and remove it when you don’t want it to appear.

By connecting your iPad, or another external camera to your laptop, you have the option to place multiple live shots on the same slide. You could have one camera on the presenter, and another camera on the workspace to demonstrate what the presenter is doing. iPads can also be used for multiple views at the same time.

When might you use this?
  1. Use your iPad as the camera to screencast an app or website live on your Keynote slides without ever leaving Keynote. You don’t have to switch mirroring or displays to switch from one device to another.
  2. Create a dynamic video presentation. Using a laptop or iPad, you can screen record a Keynote presentation that displays your slide content, a small window of you talking, and a demonstration of the activity about which you are teaching. 
  3. Use the iPad as a document camera to show a book or document while presenting. Or, project a closeup demonstration of you or a student modeling something without ever leaving your presentation. 
  4. Open the Apple Numbers app or Jamboard on iPad to have a live whiteboard embedded in your Keynote slide.
  5. On an iPad, conduct an interview with the front camera facing the interviewer and the rear camera facing the interviewee. Record the interview, then create an engaging video by using iMovie or Clips to edit, add music, introductions, and captions.
Don’t forget, your students can do all of these things too! Having students explore this feature can lead to many creative projects, assessments, or other demonstrations of knowledge.

Secret Powers of the Often-Overlooked Notes App

Whether or not you are a user of Apple’s Notes app, there are likely at least a few features that you may not have yet discovered in this powerful and sometimes-overlooked app. Further, the Notes app can be used by students and teachers alike as a learning and/or teaching tool.

I first began using the Notes app to help me organize my personal information. My favorite Notes app feature is that any note I add on any device automatically appears on all my devices (I use the same Apple ID on all my devices). Thus, I can add a note on my iPad at a meeting, and I can check it on my iPhone later when I’m not at my desk. 

This article discusses some of my favorite uses of the Notes app in my various roles as a learner, teacher, and leader. 

Search

Notes can be easily searched. I seem to recall a quote about technology and creativity from director Ang Lee, but I can’t remember any other details. Using the Search field at the top of the Notes list, I can easily search “Ang Lee” in Notes and find his quote from a Tech Conference that I typed back in 2013.

Teaching and Learning Implications: Save notes, ideas, and learning over a period of years (attached to your Apple ID). Then you can easily save and find your notes. (I have around 1,000 notes in my Notes app since 2012.)


Notes Media

When the Notes app was first released, it allowed text and images, but not much else. Now a note can include photos, drawings, videos, audio, and notes can include tags (more on that later).

Text

The text features in Notes have been enhanced over the years with a few basic style options (Title, Heading, Subheading, Body, Monospaced). It is also possible to insert a simple table (grid) in notes.


Text Checklists

Using the checkbox tool, you can add unchecked bullets to the beginning of checklist items. After you check the first item, the note allows you to decide whether you wish to sort the item (by moving it to the bottom of the list after it's checked).

Teaching and Learning Implications: This feature is a great way to create quick to-do lists on the fly that can be shared with students or peers. You can use the Share note feature (explained below) to allow multiple users to see and/or check off list items.

Dictated Text (Speech to Text)

Like any text entry option on an Apple device, you can easily dictate text instead of typing it. You likely already know that you can dictate punctuation by saying “period” or “comma,” but in a note (and elsewhere) you can say “new line” for a return to be added. Dictate a note by tapping the microphone symbol located at the bottom of the iPad/iPhone keyboard. (On a Mac, set up Dictation in the Keyboard System Preference under the Dictation tab.)

Teaching and Learning Implications: Speech-to-Text is available on all Apple devices. Although it was developed as an Accessibility feature, it can be used by anyone to input text.

Scan to PDF

The Scan to PDF is arguably among the most overlooked features of Notes. The feature is shockingly easy to use if you know where to find it: create or open a note in Notes, tap the camera icon, and tap Scan Documents. Lay a paper document flat and use the camera to take a picture of it to convert it to a PDF. Make sure to tap Save when finished capturing all the pages in the PDF. The PDF will be saved in a note—and show up on all your devices.

Teaching and Learning Implications: I use the scan feature whenever anyone hands me a piece of paper or business card. I immediately scan it to PDF and give back the paper. For anyone who likes having access to information anytime/anywhere, this feature is exceptionally useful. (Further, scanned documents accessed on iPhone or Mac automatically convert the scanned text to text that can be copied and pasted. Our new iPads will also allow this feature!)

Screen Captures

When I’m watching a Zoom with a presentation on laptop, I usually have my Notes app open next to my Zoom window. When I’m on a computer, I find it handy to use the shift+command+4 feature to take screen shots of the part showing the presentation and then immediately drag the temporary screen shot icon (that appears in the lower-right corner) directly into Notes. I encourage you to try this...it’s an amazing feature!

Teaching and Learning Implications: When I’m taking notes and encounter a visual that corresponds to my typed information, this feature allows me to immediately combine the image with my text. This feature also works on an iPad in split-screen mode (using the iPad's screen capture function and the Copy feature under the Share icon).

Photos

You can easily drag photos into notes from the Photos app, from the Desktop of your computer, or directly from a webpage using multiple open windows on Mac (or split screen view on iPad). Just drag the icon or image from one window into a note in the Notes app. By default, the image fills the width of the note, but if you tap and hold (on iPad or iPhone), you may select Small Images to reduce all images in that note to icon-size. A tap will toggle between small/full-size images. You can also capture a photo directly in the Notes app using the camera icon (select Take Photo or Video). Finally, you can use the markup tool (the pen tip in a circle) and use the draw tools to draw directly on a photo in a note in the Notes app.

Teaching and Learning Implications: Like screen captures (explained above), I often use photos when I’m taking notes with a presenter using visuals on a screen. I can easily snap a photo (using the camera icon and selecting Take Photo or Video) and add the photo immediately to a note.

Drawings

Using a Logitech crayon (or Apple Pencil, your finger, or mouse/trackpad), tap or click the markup tool (the pen tip in a circle) and use the simple draw tools to make a sketch that is embedded into the note.

Teaching and Learning Implications: This feature allows users to immediately add a quick sketch to a note with simple drawing tools.

Videos

You can embed a video from the Photos app that you have already created into a note (using copy/paste) . You can also capture a video directly in the Notes app using the camera icon (select Take Photo or Video).

Teaching and Learning Implications: Adding a video to a note allows a the Notes app to “come alive” with either video content that relates directly with a note, or with a video reflection recorded on the fly by me—or others around me—while I am creating a note. PLEASE NOTE: Video files will cause the Notes app to synchronize more slowly because large video files take longer to transfer than text; thus, I tend to use videos in my notes sparingly.
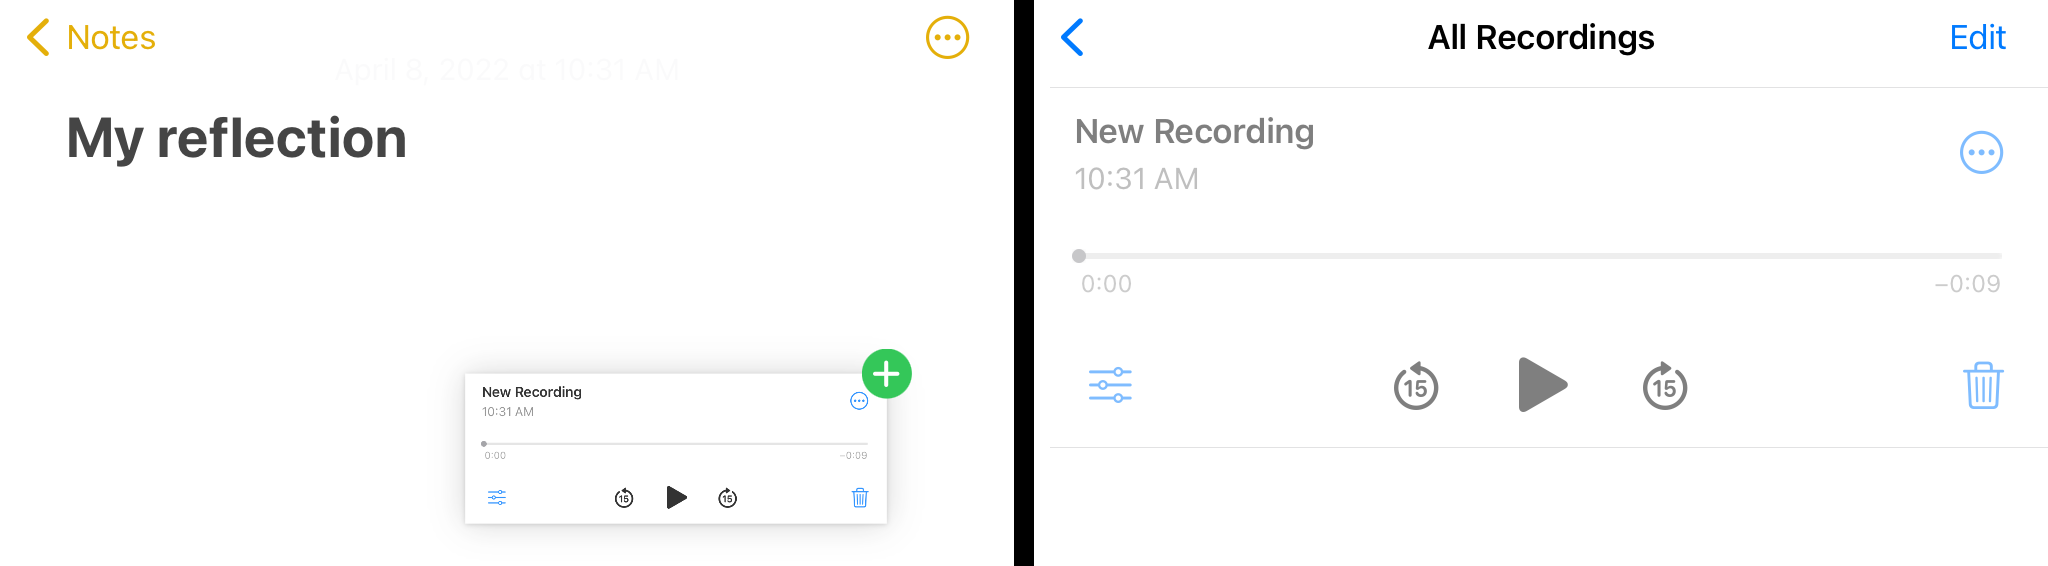
Audio

You can embed an audio file from the Voice Memos app that you have already created into a note. Either copy/paste the voice memo to Notes or use open windows (Mac) or split screen (iPad) to drag the voice memo from the Voice Memos app to the note.


Teaching and Learning Implications: Like the video examples above, this feature allows for audio reflections in your recorded voice or the voice of your students. You may also use this feature to collect audio files and easily organize them with notes in the Notes app as you plan a larger project, such as a podcast or an audio-recorded oral history.

Tags

The Notes app recently added the ability to categorize notes with hashtags. Simply type a hashtag in a note, e.g., #creativity, and a single tap will give you to access all your notes that contain that tag. All your tags are visible in the Tags section of the Folders view of the Notes app.

Teaching and Learning Implications: This is a welcome organizational feature for all users of the Notes app!

Collaboration

Finally, notes can be shared among users with Apple IDs. Tap the more symbol with three dots (ellipsis) in a circle (...), select Share Note, and select among the various share options available. You can decide if the people you invite can make changes or if they can add others to the note. (If you don’t need collaboration features, you can also just share the note with someone.)

Teaching and Learning Implications: While only Barrington 220 staff and high school students have the ability to use Apple IDs at this time, we hope to be able to add Apple ID access at all grade levels soon to be able to fully take advantage of all of Apple’s Collaboration features across the Notes app and other apps.


Infinite Campus Virtual One-Day Conference This Week!


The 2022 ILICUG (Virtual) Conference is underway! As mentioned in last month's newsletter, the Illinois Infinite Campus Users Group is hosting a virtual one day conference on Wednesday, April 13, 2022. This conference is combination of live sessions and pre-recorded sessions that can played at the attendee's leisure. Some of these sessions are modeled on the "Flipped-Classroom" model and questions about the topics can be submitted in advance of the live session via a Google Form.

This year, due to continuing social distancing and altered district policies on travel, ILICUG is bringing the conference to you. The presenters have recorded sessions that you can watch from the comfort of your office, classroom, or home, whenever it fits your schedule. You’ll be able to submit questions to the presenters of these sessions through the form below.

Then, on April 13, 2022, tune in for some live sessions. The live portion of the conference will kick things off with Zoom general session from the ILICUG leadership at 8:30 A.M., followed by a Zoom keynote from Infinite Campus Founder & CEO, Charlie Kratsch at 9:00 A.M. Throughout the rest of the day, join live roundtable discussions led by the presenters, who will take the time to answer the questions you submitted in the form.

Because of the virtual format, there is no registration required! Simply watch any of the sessions here, fill out the question submission form if you have any questions for the presenters by April 11, 2022, and then join us live on April 13, 2022.

Click here to view the links to the recorded and live sessions, as well as the questions submission form. We hope to see you on April 13, 2022!

New System Login Security Coming Soon!

As mentioned in a February 2022 #bsd220tech article, the use of multi-factor authentication (MFA) will soon become a critical tool used along side other Barrington 220 systems (Google, Skyward and Infinite Campus). The tech team is gearing up for a district-wide staff rollout. MFA is now a requirement for Barrington 220 (and other school districts) to maintain cybersecurity insurance coverage.

Systems that use multi-factor authentication (MFA) require two or more methods for a user to access a system, usually consisting of something you know (i.e., a password) and something you have, a device such as a computer, iPad, cell phone, or office phone. This second step of authentication greatly enhances the security of our systems and helps in proving that it is truly you logging into one of our systems.

Each of our Barrington 220 employees has a district computer, an iPad, and/or an iPhone that will work with this multi-factor authentication system.

We do not restrict the access of Barrington 220 Gmail from personal devices. Similarly, for your convenience, we will now allow the use of a personal mobile phone for MFA authentication. This is not necessary, but may be preferred by some staff. Typical of our Google system, logins to Google, Skyward and IC are not going to be needed on a daily basis, but when they are needed, a device used for MFA will need to be nearby. Your mobile phone is likely typically near you—while your iPad and/or computer may not be as readily available. The mobile phone app that is needed for our MFA is Microsoft Authenticator, and this app is available for both Apple and Android phones.

Is there an upside with MFA? Absolutely! MFA makes access to systems such as Infinite Campus and Skyward a breeze. Are you already logged on to Google using MFA? Great, then logging in to Skyward or Infinite Campus will take one click, with no username or password input required. These logins will stay “persistent” for a period of time provided you are using the same computer web browser or computing device (e.g., iPad, iPhone).

Stay tuned for further information!

Popular Recent Posts