In the October issue of the #bsd220tech newsletter, we introduced our new Learning NOW series, One-Minute Spotlights. Learning NOW One-Minute Spotlights highlight some of the many ways Barrington 220 students are learning across the district in episodes that are just one minute long. The series aims to create a better understanding in the Barrington community about how students learn now and how the classroom environment has changed with the addition of a technology device in the hands of each student.
If you have missed some of the episodes or want to re-watch previous episodes for inspiration, you may always visit the Learning NOW YouTube channel at www.youtube.com/learningnow220.
Here are some One-Minute Spotlights highlighting various Barrington 220 grade levels:
Jennifer Domanico - Kindergarten
Sarah Dowdy - Grade 3 Word Study
Andrew Carter - Grade 4 Science
Amy Boucek - Middle School Science
Ernest Lane - High School Calculus
Laura Turngren - High School AP Biology

Thursday, December 5, 2019
Barrington 220 Teacher Tips for Apple Classroom
For our third installment of the #bsd220tech monthly feature, Share Your Best, we asked teachers to Share Your Best tips, tricks, or tactics with Apple Classroom. THANK YOU to our contributors! Here are the tips:
 Our first submission came from Josh Wager, STEM teacher at Sunny Hill Elementary, about using the app Apple Classroom. He said:
 Since our request was not specific about submitting a tip about the app “Apple Classroom,” we also got a great tip from Barrington High School Freshmen English teacher Justine Rovin about how she successfully allows student choice in her Apple-enabled classroom:

"I have to say it is simply the ability to congratulate kids from far away. When they know you are 'seeing' what they are doing, they work harder. When I acknowledge their work, which I can see via Apple Classroom, they feel validated and work that much harder!"

"In instructional Freshmen English, students chose the platform to deliver their listening and speaking assignments. Students chose from Apple Clips, iMovie, GarageBand, and Voice Memos to deliver their content. The creativity and depth was inspiring!"For the next issue, we are asking you to share tips, tricks, or tactics for helping your students cite their text or image online sources in the grade level(s) you teach.
Key's Quick Tips: Snap&Read Universal
Key's Quick Tips are provided by Kelly Key, Assistive Technology Coordinator for Barrington 220. Each month, I will feature a tool available on the iPad to support our students, including a short video demonstration. This month, I highlight a new app available for all staff and students to support reading and editing writing.


This app allows a student to take a picture of text (a newspaper, book, worksheet, their handwritten document, etc.), it converts the picture into digital text with its advanced OCR feature, and it will read the text out loud!
Click here to see it in action

Additional features include:
Text Leveling - Adjusts the readability of text without changing the meaning


Check it out here


To use this app, download it from self-service and log in with your Google account and explore these amazing features!
Please contact me with any questions, or if you would like me to train your staff or students kkey@barrington220.org


To use this app, download it from self-service and log in with your Google account and explore these amazing features!
Please contact me with any questions, or if you would like me to train your staff or students kkey@barrington220.org
5 Ways to Help Our Students be Better Consumers of Information
Last Spring, Barrington 220 students were surveyed about the One to World program, our learning program that puts an iPad into the hands of each of our students. The results tell us how our students are using iPad and how learning experiences have changed as a result of being in a digital learning environment. District-wide, 4,484 students responded and the results help us make recommendations to improve our program for teachers, students, and parents.
One result that stood out was the percentage of students who use their device to research/search for information on the web at least weekly. We found that 88% of elementary students, 91% of middle school students, and 95% of high school students stated that they search the web for information at least weekly. Overall, more than half the respondents stated that they do this daily. The fact is that when our students want to know something, they are turning to the Internet to find it. In one regard this is a good thing. One of our goals as a district is to develop independent learners who know how to find and use information on their own. But this result does underscore our responsibility as educators to ensure that our students are intelligent consumers of information. How can we be sure that our students are finding credible sources? How do we know that they can discern reliable information from “fake news?"
Here are five ways you can improve your students’ abilities as digital consumers of information.
- Seek out your Teacher Librarian. Our district has some of the most talented and hardworking Teacher Librarians in the business. At each school, you have an invaluable resource who knows how to teach our students about all aspects of digital citizenship. By inviting your Teacher Librarian into your class to work with you in this area, you are tapping the best resource available for your students. Our Teacher Librarians have specific lessons on the topics of discerning credible sources, proper citations of information, and many more.
- Educate yourself. As your students have discovered, the Internet is full of great information, and the area of digital citizenship is no exception. Take some time to educate yourself on the topic so that you are better equipped to help your students when they are researching for a project. One of the best places to start is Common Sense Media. This organization has a wealth of information for educators (in English and Spanish).
- Model digital citizenship. Have you ever given a presentation in class and not cited your sources? Do you make sure you are using royalty-free images in your presentations? When you find an article for students to read, do you check that it’s accurate? Do you question the author's intent and potential bias? Have you ever borrowed from another teacher or author and not given credit? Your students may not notice when you don’t practice good habits, but they definitely notice when you do. By setting an example in class, you are showing your students on a regular basis what proper digital etiquette looks like.
- Maintain expectations for your students. Make it part of your classroom culture to question sources, give credit, and check for accuracy and reliability. Add language to your assignment descriptions that communicates this expectation. It doesn’t necessarily have to be part of the rubric or grade, but it needs to be present. Students are using so much information they find online that it's easy to overlook these important habits. When a student presents information they found online, develop the class culture of questioning things like credibility and accuracy.
- Accept that this is a shared responsibility. Teaching and modeling digital citizenship and proper citation of sources is not the responsibility of any one teacher. Ensuring that our students are intelligent consumers of information is a shared responsibility. Imagine how our students would grow in this area if every assignment held the expectation that students vet the information they find and give credit to the information sources. By sharing these responsibilities, these best practices will become habits for our students and for us.
Introducing the Teacher's Advisory Tool in Infinite Campus
Adapted from an article by Infinite Campus
The Advisory tool can be found in Campus Instruction. More information previously available only through Campus Tools is now available in Campus Learning.
NOTE: Any Barrington 220-specific tabs and fields will only be available in Campus Tools.
The Advisory tool is designed to help teachers target areas of improvement for the students they mentor. The first screen lists students with the number of assignments they have flagged as missing or late and the number of non-passing grades. Click a student to view more details in the student profile.

The Advisory tool helps teachers identify student needs.
This checkbox pushed from the course master to linked courses. If selected for a course, the checkbox is automatically marked for its sections without being pushed.
By Teacher
Section Summary View
The first screen of the Advisory tool displays a list of students in the Section selected at the top. All students in the section are listed, along with counts for the number of missing and late assignments and the number of non-passing grades across all of the students' sections. Click a row to view that student's profile.
Counts are determined as follows:

Filter the student list to only show students with the selected assignments and grades.
Student Profile
Four sections display in the student profile:

Today's Schedule
The student's schedule is listed with Room numbers. The section where the student is currently scheduled is indicated with a border
 .
.
Grades
Grades are only shown for the current section, from which the student's information was accessed.

Attendance
Attendance is shown for the current month, for this section only. Absences and tardies are totaled in the legend at the bottom. Scroll within the calendar to view other months.

Student To Do
The To Do section lists the student's assignments based on the option selected. Use the dropdown list to show all assignment past due, overdue assignments from the last 30 or 7 days, or assignments due in the next 7 days. Use the arrows below the list to page through the list, if available.
Assignments considered past due have a due date prior to today, are not scored, and do not have the Turned In flag marked. This list is not dependent on the Late flag.
The ability to view upcoming assignments and missing assignments is very helpful when working with students who are struggling or behind with class work.
NOTE: Remember, teachers can synch assignment from Schoology before a grade has been entered to allow staff, parents, and students access to more current class information.

View assignments that are past due or those due in the future.
Assignments from any of the student's sections may be listed, not just assignments in the current section or sections taught by the current teacher.
Click an assignment to view more information.
In-Progress Grades
The In-Progress Grades section displays grades for the student's courses in the current term.

Grades and progress through standards are shown below the summary.
Above the grades, the GPA, Credits, and Graduation Progress are displayed. Barrington 220 teachers should not be concerned Graduation shows as Off Track. Please review the GPS and credits earned.
Cumulative GPA values are found on the Grades tab. See the GPA Calculations in Campus for the actual calculation.
The Credit information indicates if the number of credits the student has earned out of the number required. This data is found on the student's transcript.
Progress towards graduation reports based on the Progress tab in Academic Planning.
Grades are listed by course. For grading tasks, the student's in-progress grade is shown for each task aligned to the course. For standards, a progress bar indicates the percentage of standards aligned to the course for which the student has a posted grade.
Click on a grade for a grading task to view a list of assignments and scores. Click the progress bar for a standard to view the standards for the course and the student's proficiency for each, whether in-progress or posted.
Attendance
The Attendance section can be filtered to show attendance totals for the year, the last 30 days, or the last 7 days. The total number of full day and period absences and of tardies display above the calendar. Full day absences are calculated using the whole/half day minutes entered on the calendar and do not follow state-specific attendance calculations.
Filter the calendar view by full day absences, period absences, or tardies. When filtered by absences, days are color-coded by excuse.

Attendance events display in the calendar and are color-coded.
Click an attendance event to view more information. If attendance letters have been sent to the student, a list of when letters were sent is shown. Letters cannot be viewed or generated from this tool.
The Advisory tool can be found in Campus Instruction. More information previously available only through Campus Tools is now available in Campus Learning.
NOTE: Any Barrington 220-specific tabs and fields will only be available in Campus Tools.
The Advisory tool is designed to help teachers target areas of improvement for the students they mentor. The first screen lists students with the number of assignments they have flagged as missing or late and the number of non-passing grades. Click a student to view more details in the student profile.
The Advisory tool helps teachers identify student needs.
This checkbox pushed from the course master to linked courses. If selected for a course, the checkbox is automatically marked for its sections without being pushed.
By Teacher
Section Summary View
The first screen of the Advisory tool displays a list of students in the Section selected at the top. All students in the section are listed, along with counts for the number of missing and late assignments and the number of non-passing grades across all of the students' sections. Click a row to view that student's profile.
Counts are determined as follows:
- Missing: Assignments flagged as missing.
- Late: Assignments flagged as late that do not have scores. Note: assignments marked as late by typing an "L" for the score are not included in this count.
- Non-Passing Grades: Grades for tasks or standards that are not flagged as Passing on the score group or rubric. This column first looks at posted grades and then considers in-progress grades where grades have not been posted.
Filter the student list to only show students with the selected assignments and grades.
Student Profile
Four sections display in the student profile:
Student
The Student section provides basic information about the student, including student number, grade, and date of birth. Click on the student's name to view more information.

Click a student's name to view more information, including contact information, schedule, grades, and attendance.
Expand a section to view student information:
The Student section provides basic information about the student, including student number, grade, and date of birth. Click on the student's name to view more information.
Click a student's name to view more information, including contact information, schedule, grades, and attendance.
Expand a section to view student information:
- Section
- Description
- Contact Information
Today's Schedule
The student's schedule is listed with Room numbers. The section where the student is currently scheduled is indicated with a border
. Grades
Grades are only shown for the current section, from which the student's information was accessed.
Attendance
Attendance is shown for the current month, for this section only. Absences and tardies are totaled in the legend at the bottom. Scroll within the calendar to view other months.
Student To Do
The To Do section lists the student's assignments based on the option selected. Use the dropdown list to show all assignment past due, overdue assignments from the last 30 or 7 days, or assignments due in the next 7 days. Use the arrows below the list to page through the list, if available.
Assignments considered past due have a due date prior to today, are not scored, and do not have the Turned In flag marked. This list is not dependent on the Late flag.
The ability to view upcoming assignments and missing assignments is very helpful when working with students who are struggling or behind with class work.
NOTE: Remember, teachers can synch assignment from Schoology before a grade has been entered to allow staff, parents, and students access to more current class information.
View assignments that are past due or those due in the future.
Assignments from any of the student's sections may be listed, not just assignments in the current section or sections taught by the current teacher.
Click an assignment to view more information.
In-Progress Grades
The In-Progress Grades section displays grades for the student's courses in the current term.
Grades and progress through standards are shown below the summary.
Above the grades, the GPA, Credits, and Graduation Progress are displayed. Barrington 220 teachers should not be concerned Graduation shows as Off Track. Please review the GPS and credits earned.
Cumulative GPA values are found on the Grades tab. See the GPA Calculations in Campus for the actual calculation.
The Credit information indicates if the number of credits the student has earned out of the number required. This data is found on the student's transcript.
Progress towards graduation reports based on the Progress tab in Academic Planning.
Grades are listed by course. For grading tasks, the student's in-progress grade is shown for each task aligned to the course. For standards, a progress bar indicates the percentage of standards aligned to the course for which the student has a posted grade.
Click on a grade for a grading task to view a list of assignments and scores. Click the progress bar for a standard to view the standards for the course and the student's proficiency for each, whether in-progress or posted.
Attendance
The Attendance section can be filtered to show attendance totals for the year, the last 30 days, or the last 7 days. The total number of full day and period absences and of tardies display above the calendar. Full day absences are calculated using the whole/half day minutes entered on the calendar and do not follow state-specific attendance calculations.
Filter the calendar view by full day absences, period absences, or tardies. When filtered by absences, days are color-coded by excuse.
Attendance events display in the calendar and are color-coded.
Click an attendance event to view more information. If attendance letters have been sent to the student, a list of when letters were sent is shown. Letters cannot be viewed or generated from this tool.
Tips from the Techs
The holidays are approaching and the Barrington 220 Tech Team has gifted us all by sharing several tech tips you can use right now to increase your productivity or enhance your classroom experience!
Configure Your Menu Bar on Mac
by Charlie Parkinson
Don’t like the way your menu bar is configured? If you hold command while dragging the icons you can set it to your preference. Check out the video below.
Multitasking on iPad
by Kaitlyn Pankiewicz
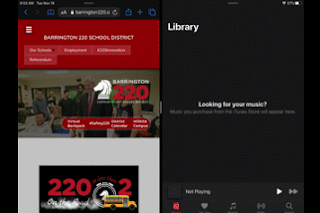
Split View on the iPad will allow you to use multiple apps at the same time on one screen.
Below are instructions on how to use Split View.
Note: iPad must be in landscape view to use this.
Open an app (Safari, Mail, etc).
Open your dock by swiping up from the bottom of the screen.
When you see the dock, touch and hold the second app you want to open and drag it to the screen.
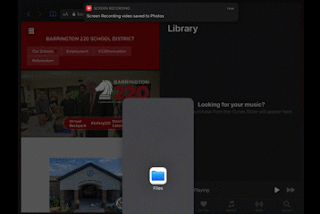
To add a Slide Over Screen
Open your dock (slide up from the bottom of the screen).
Drag the third app you want to use to the divider between the two apps.
You can switch between multiple apps while Split View is activated. If you want to switch apps. You select the app and then slide it to the left or right.
iPad Keyboard Tips
by Jason Bryant
Apple offers three different positions for the iPad onscreen keyboard. Docked/Undocked, Floating, and Split.
To change your keyboard view, tap and hold the keyboard icon.
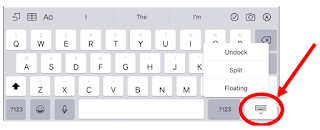
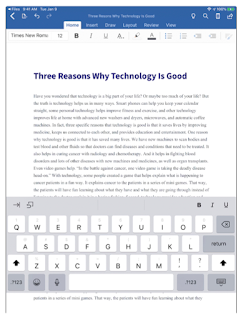
Split View looks like this: This is great for thumb typers.
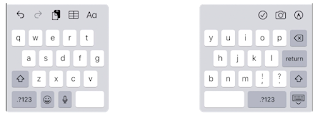
Floating Keyboard looks like this: This is useful if you use a Logitech Crayon or other stylus.

Undocked allows you to have the keyboard in the middle of the screen.
Free up Storage on Your iPad
by Justin Edge
Wondering what’s taking up all the space on your iPad?
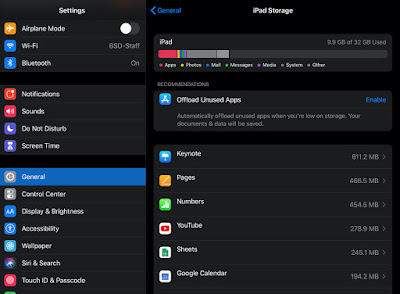
Your iPad breaks down where all of your iPad space is being allocated to. To see this in a visual form, visit Settings > General > iPad Storage.
Here you will see a visual bar showing you where content is located on your iPad (Apps, Photos, Mail, etc). Below this bar the iPad will break down the largest applications on your iPad and sort them from largest to smallest.
Tapping on one of the apps will further break down the space being used and allow you to delete the app with a “Delete App” button.
Back Up Your Data to Your Google Drive on a Mac
by Bob Jensen
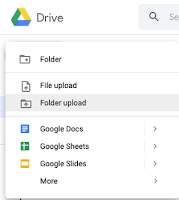
Log into your Google Drive. Once you are logged into your Google Drive select My Drive. Then tap the +New button.
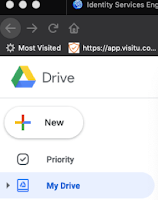
After you tap +New, select Upload File or Upload Folder.
When the next window opens, select the file or folder that you would like to back up to your Google Drive.
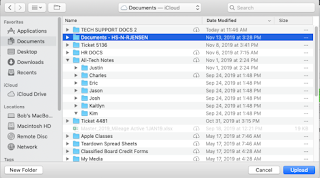
Click the Upload button.
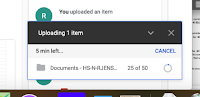
After clicking upload, a will screen pop-up showing progress the active upload.
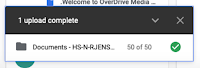
You will be notified by a message that the upload has completed.
Free Up Storage on Your Mac
by Josh Beatty

When you receive this message, how do you know what files are taking up all that space on your Mac’s hard drive? You have already emptied your trash and cleaned out your Downloads folder, but your drive is still mostly full. Luckily, there is a tool built into macOS that can help.
First look for Apple Menu in the upper left hand corner of your screen. Click on the Apple icon and select About This Mac from the drop down menu.

Once the About This Mac window opens click on Storage.

On the first screen you will see a color-coded status bar showing how much of your Mac’s hard drive is being used and how much space is being used by different types of files. To look a little deeper click on the Manage button.

In the Manage window there is a list of file types and the amount of space they are using in the left-side pane. If you click on one of file types you will see a list of the largest files of that type in the right pane If you click on one of the files you can use the Show in Finder button to see the location of the file or the Delete button to permanently delete the file.

One area that I always check is iOS Files. It may contain backups for old phones or iPads that you no longer have, or you may have inadvertently created a backup for an iOS device when plugging it into your Mac to charge. Those backups can be deleted here.

Prevent Apple TV Video Buffering
by Kim Martinez
Are you using an Apple TV and getting a message that videos are "buffering" (pausing, stopping, stuttering, etc.)? Try copying and pasting the URL link (web address) into Safari and then click on the AirPlay icon and select your Apple TV.
Customize the Finder Sidebar on Mac
by Eric Delgado
You've probably noticed all those folders and items on the left side of your Finder windows. (If not go to the Finder and from the View menu and select Show Sidebar). You can add your own folders to the Sidebar. Drag any folder to the side and that’s it. Now the cool part isn’t just that you now have one-click access to that folder, but anything you drop onto that folder will be copied or moved there.
Configure Your Menu Bar on Mac
by Charlie Parkinson
Don’t like the way your menu bar is configured? If you hold command while dragging the icons you can set it to your preference. Check out the video below.
Multitasking on iPad
by Kaitlyn Pankiewicz
Split View on the iPad will allow you to use multiple apps at the same time on one screen.
Below are instructions on how to use Split View.
Note: iPad must be in landscape view to use this.
Open an app (Safari, Mail, etc).
Open your dock by swiping up from the bottom of the screen.
When you see the dock, touch and hold the second app you want to open and drag it to the screen.

To add a Slide Over Screen
Open your dock (slide up from the bottom of the screen).
Drag the third app you want to use to the divider between the two apps.

You can switch between multiple apps while Split View is activated. If you want to switch apps. You select the app and then slide it to the left or right.

iPad Keyboard Tips
by Jason Bryant
Apple offers three different positions for the iPad onscreen keyboard. Docked/Undocked, Floating, and Split.
To change your keyboard view, tap and hold the keyboard icon.

Split View looks like this: This is great for thumb typers.

Floating Keyboard looks like this: This is useful if you use a Logitech Crayon or other stylus.

Undocked allows you to have the keyboard in the middle of the screen.

Free up Storage on Your iPad
by Justin Edge
Wondering what’s taking up all the space on your iPad?
Your iPad breaks down where all of your iPad space is being allocated to. To see this in a visual form, visit Settings > General > iPad Storage.
Here you will see a visual bar showing you where content is located on your iPad (Apps, Photos, Mail, etc). Below this bar the iPad will break down the largest applications on your iPad and sort them from largest to smallest.
Tapping on one of the apps will further break down the space being used and allow you to delete the app with a “Delete App” button.
Back Up Your Data to Your Google Drive on a Mac
by Bob Jensen
Log into your Google Drive. Once you are logged into your Google Drive select My Drive. Then tap the +New button.

After you tap +New, select Upload File or Upload Folder.

When the next window opens, select the file or folder that you would like to back up to your Google Drive.

Click the Upload button.
After clicking upload, a will screen pop-up showing progress the active upload.

You will be notified by a message that the upload has completed.

Free Up Storage on Your Mac
by Josh Beatty
When you receive this message, how do you know what files are taking up all that space on your Mac’s hard drive? You have already emptied your trash and cleaned out your Downloads folder, but your drive is still mostly full. Luckily, there is a tool built into macOS that can help.
First look for Apple Menu
in the upper left hand corner of your screen. Click on the Apple icon and select About This Mac from the drop down menu.Once the About This Mac window opens click on Storage.
On the first screen you will see a color-coded status bar showing how much of your Mac’s hard drive is being used and how much space is being used by different types of files. To look a little deeper click on the Manage button.
In the Manage window there is a list of file types and the amount of space they are using in the left-side pane. If you click on one of file types you will see a list of the largest files of that type in the right pane If you click on one of the files you can use the Show in Finder button to see the location of the file or the Delete button to permanently delete the file.
One area that I always check is iOS Files. It may contain backups for old phones or iPads that you no longer have, or you may have inadvertently created a backup for an iOS device when plugging it into your Mac to charge. Those backups can be deleted here.
Prevent Apple TV Video Buffering
by Kim Martinez
Are you using an Apple TV and getting a message that videos are "buffering" (pausing, stopping, stuttering, etc.)? Try copying and pasting the URL link (web address) into Safari and then click on the AirPlay icon and select your Apple TV.

Customize the Finder Sidebar on Mac
by Eric Delgado
You've probably noticed all those folders and items on the left side of your Finder windows. (If not go to the Finder and from the View menu and select Show Sidebar). You can add your own folders to the Sidebar. Drag any folder to the side and that’s it. Now the cool part isn’t just that you now have one-click access to that folder, but anything you drop onto that folder will be copied or moved there.
Subscribe to:
Posts (Atom)
Popular Recent Posts
-
At the end of last school year and the start of this one, we upgraded from an outdated analog phone system to a cutting-edge digital solutio...
-
 Around January 18, 2021, Infinite Campus will be rolling out a new look to teacher portal pages—along with a couple of new features. This n...
