In the October issue of the #bsd220tech newsletter, we introduced our new Learning NOW series, One-Minute Spotlights. Learning NOW One-Minute Spotlights highlight some of the many ways Barrington 220 students are learning across the district in episodes that are just one minute long. The series aims to create a better understanding in the Barrington community about how students learn now and how the classroom environment has changed with the addition of a technology device in the hands of each student.
If you have missed some of the episodes or want to re-watch previous episodes for inspiration, you may always visit the Learning NOW YouTube channel at www.youtube.com/learningnow220.
Here are some One-Minute Spotlights highlighting various Barrington 220 grade levels:
Jennifer Domanico - Kindergarten
Sarah Dowdy - Grade 3 Word Study
Andrew Carter - Grade 4 Science
Amy Boucek - Middle School Science
Ernest Lane - High School Calculus
Laura Turngren - High School AP Biology

Thursday, December 5, 2019
Barrington 220 Teacher Tips for Apple Classroom
For our third installment of the #bsd220tech monthly feature, Share Your Best, we asked teachers to Share Your Best tips, tricks, or tactics with Apple Classroom. THANK YOU to our contributors! Here are the tips:
 Our first submission came from Josh Wager, STEM teacher at Sunny Hill Elementary, about using the app Apple Classroom. He said:
 Since our request was not specific about submitting a tip about the app “Apple Classroom,” we also got a great tip from Barrington High School Freshmen English teacher Justine Rovin about how she successfully allows student choice in her Apple-enabled classroom:

"I have to say it is simply the ability to congratulate kids from far away. When they know you are 'seeing' what they are doing, they work harder. When I acknowledge their work, which I can see via Apple Classroom, they feel validated and work that much harder!"

"In instructional Freshmen English, students chose the platform to deliver their listening and speaking assignments. Students chose from Apple Clips, iMovie, GarageBand, and Voice Memos to deliver their content. The creativity and depth was inspiring!"For the next issue, we are asking you to share tips, tricks, or tactics for helping your students cite their text or image online sources in the grade level(s) you teach.
Key's Quick Tips: Snap&Read Universal
Key's Quick Tips are provided by Kelly Key, Assistive Technology Coordinator for Barrington 220. Each month, I will feature a tool available on the iPad to support our students, including a short video demonstration. This month, I highlight a new app available for all staff and students to support reading and editing writing.


This app allows a student to take a picture of text (a newspaper, book, worksheet, their handwritten document, etc.), it converts the picture into digital text with its advanced OCR feature, and it will read the text out loud!
Click here to see it in action

Additional features include:
Text Leveling - Adjusts the readability of text without changing the meaning


Check it out here


To use this app, download it from self-service and log in with your Google account and explore these amazing features!
Please contact me with any questions, or if you would like me to train your staff or students kkey@barrington220.org


To use this app, download it from self-service and log in with your Google account and explore these amazing features!
Please contact me with any questions, or if you would like me to train your staff or students kkey@barrington220.org
5 Ways to Help Our Students be Better Consumers of Information
Last Spring, Barrington 220 students were surveyed about the One to World program, our learning program that puts an iPad into the hands of each of our students. The results tell us how our students are using iPad and how learning experiences have changed as a result of being in a digital learning environment. District-wide, 4,484 students responded and the results help us make recommendations to improve our program for teachers, students, and parents.
One result that stood out was the percentage of students who use their device to research/search for information on the web at least weekly. We found that 88% of elementary students, 91% of middle school students, and 95% of high school students stated that they search the web for information at least weekly. Overall, more than half the respondents stated that they do this daily. The fact is that when our students want to know something, they are turning to the Internet to find it. In one regard this is a good thing. One of our goals as a district is to develop independent learners who know how to find and use information on their own. But this result does underscore our responsibility as educators to ensure that our students are intelligent consumers of information. How can we be sure that our students are finding credible sources? How do we know that they can discern reliable information from “fake news?"
Here are five ways you can improve your students’ abilities as digital consumers of information.
- Seek out your Teacher Librarian. Our district has some of the most talented and hardworking Teacher Librarians in the business. At each school, you have an invaluable resource who knows how to teach our students about all aspects of digital citizenship. By inviting your Teacher Librarian into your class to work with you in this area, you are tapping the best resource available for your students. Our Teacher Librarians have specific lessons on the topics of discerning credible sources, proper citations of information, and many more.
- Educate yourself. As your students have discovered, the Internet is full of great information, and the area of digital citizenship is no exception. Take some time to educate yourself on the topic so that you are better equipped to help your students when they are researching for a project. One of the best places to start is Common Sense Media. This organization has a wealth of information for educators (in English and Spanish).
- Model digital citizenship. Have you ever given a presentation in class and not cited your sources? Do you make sure you are using royalty-free images in your presentations? When you find an article for students to read, do you check that it’s accurate? Do you question the author's intent and potential bias? Have you ever borrowed from another teacher or author and not given credit? Your students may not notice when you don’t practice good habits, but they definitely notice when you do. By setting an example in class, you are showing your students on a regular basis what proper digital etiquette looks like.
- Maintain expectations for your students. Make it part of your classroom culture to question sources, give credit, and check for accuracy and reliability. Add language to your assignment descriptions that communicates this expectation. It doesn’t necessarily have to be part of the rubric or grade, but it needs to be present. Students are using so much information they find online that it's easy to overlook these important habits. When a student presents information they found online, develop the class culture of questioning things like credibility and accuracy.
- Accept that this is a shared responsibility. Teaching and modeling digital citizenship and proper citation of sources is not the responsibility of any one teacher. Ensuring that our students are intelligent consumers of information is a shared responsibility. Imagine how our students would grow in this area if every assignment held the expectation that students vet the information they find and give credit to the information sources. By sharing these responsibilities, these best practices will become habits for our students and for us.
Introducing the Teacher's Advisory Tool in Infinite Campus
Adapted from an article by Infinite Campus
The Advisory tool can be found in Campus Instruction. More information previously available only through Campus Tools is now available in Campus Learning.
NOTE: Any Barrington 220-specific tabs and fields will only be available in Campus Tools.
The Advisory tool is designed to help teachers target areas of improvement for the students they mentor. The first screen lists students with the number of assignments they have flagged as missing or late and the number of non-passing grades. Click a student to view more details in the student profile.

The Advisory tool helps teachers identify student needs.
This checkbox pushed from the course master to linked courses. If selected for a course, the checkbox is automatically marked for its sections without being pushed.
By Teacher
Section Summary View
The first screen of the Advisory tool displays a list of students in the Section selected at the top. All students in the section are listed, along with counts for the number of missing and late assignments and the number of non-passing grades across all of the students' sections. Click a row to view that student's profile.
Counts are determined as follows:

Filter the student list to only show students with the selected assignments and grades.
Student Profile
Four sections display in the student profile:

Today's Schedule
The student's schedule is listed with Room numbers. The section where the student is currently scheduled is indicated with a border
 .
.
Grades
Grades are only shown for the current section, from which the student's information was accessed.

Attendance
Attendance is shown for the current month, for this section only. Absences and tardies are totaled in the legend at the bottom. Scroll within the calendar to view other months.

Student To Do
The To Do section lists the student's assignments based on the option selected. Use the dropdown list to show all assignment past due, overdue assignments from the last 30 or 7 days, or assignments due in the next 7 days. Use the arrows below the list to page through the list, if available.
Assignments considered past due have a due date prior to today, are not scored, and do not have the Turned In flag marked. This list is not dependent on the Late flag.
The ability to view upcoming assignments and missing assignments is very helpful when working with students who are struggling or behind with class work.
NOTE: Remember, teachers can synch assignment from Schoology before a grade has been entered to allow staff, parents, and students access to more current class information.

View assignments that are past due or those due in the future.
Assignments from any of the student's sections may be listed, not just assignments in the current section or sections taught by the current teacher.
Click an assignment to view more information.
In-Progress Grades
The In-Progress Grades section displays grades for the student's courses in the current term.

Grades and progress through standards are shown below the summary.
Above the grades, the GPA, Credits, and Graduation Progress are displayed. Barrington 220 teachers should not be concerned Graduation shows as Off Track. Please review the GPS and credits earned.
Cumulative GPA values are found on the Grades tab. See the GPA Calculations in Campus for the actual calculation.
The Credit information indicates if the number of credits the student has earned out of the number required. This data is found on the student's transcript.
Progress towards graduation reports based on the Progress tab in Academic Planning.
Grades are listed by course. For grading tasks, the student's in-progress grade is shown for each task aligned to the course. For standards, a progress bar indicates the percentage of standards aligned to the course for which the student has a posted grade.
Click on a grade for a grading task to view a list of assignments and scores. Click the progress bar for a standard to view the standards for the course and the student's proficiency for each, whether in-progress or posted.
Attendance
The Attendance section can be filtered to show attendance totals for the year, the last 30 days, or the last 7 days. The total number of full day and period absences and of tardies display above the calendar. Full day absences are calculated using the whole/half day minutes entered on the calendar and do not follow state-specific attendance calculations.
Filter the calendar view by full day absences, period absences, or tardies. When filtered by absences, days are color-coded by excuse.

Attendance events display in the calendar and are color-coded.
Click an attendance event to view more information. If attendance letters have been sent to the student, a list of when letters were sent is shown. Letters cannot be viewed or generated from this tool.
The Advisory tool can be found in Campus Instruction. More information previously available only through Campus Tools is now available in Campus Learning.
NOTE: Any Barrington 220-specific tabs and fields will only be available in Campus Tools.
The Advisory tool is designed to help teachers target areas of improvement for the students they mentor. The first screen lists students with the number of assignments they have flagged as missing or late and the number of non-passing grades. Click a student to view more details in the student profile.
The Advisory tool helps teachers identify student needs.
This checkbox pushed from the course master to linked courses. If selected for a course, the checkbox is automatically marked for its sections without being pushed.
By Teacher
Section Summary View
The first screen of the Advisory tool displays a list of students in the Section selected at the top. All students in the section are listed, along with counts for the number of missing and late assignments and the number of non-passing grades across all of the students' sections. Click a row to view that student's profile.
Counts are determined as follows:
- Missing: Assignments flagged as missing.
- Late: Assignments flagged as late that do not have scores. Note: assignments marked as late by typing an "L" for the score are not included in this count.
- Non-Passing Grades: Grades for tasks or standards that are not flagged as Passing on the score group or rubric. This column first looks at posted grades and then considers in-progress grades where grades have not been posted.
Filter the student list to only show students with the selected assignments and grades.
Student Profile
Four sections display in the student profile:
Student
The Student section provides basic information about the student, including student number, grade, and date of birth. Click on the student's name to view more information.

Click a student's name to view more information, including contact information, schedule, grades, and attendance.
Expand a section to view student information:
The Student section provides basic information about the student, including student number, grade, and date of birth. Click on the student's name to view more information.
Click a student's name to view more information, including contact information, schedule, grades, and attendance.
Expand a section to view student information:
- Section
- Description
- Contact Information
Today's Schedule
The student's schedule is listed with Room numbers. The section where the student is currently scheduled is indicated with a border
. Grades
Grades are only shown for the current section, from which the student's information was accessed.
Attendance
Attendance is shown for the current month, for this section only. Absences and tardies are totaled in the legend at the bottom. Scroll within the calendar to view other months.
Student To Do
The To Do section lists the student's assignments based on the option selected. Use the dropdown list to show all assignment past due, overdue assignments from the last 30 or 7 days, or assignments due in the next 7 days. Use the arrows below the list to page through the list, if available.
Assignments considered past due have a due date prior to today, are not scored, and do not have the Turned In flag marked. This list is not dependent on the Late flag.
The ability to view upcoming assignments and missing assignments is very helpful when working with students who are struggling or behind with class work.
NOTE: Remember, teachers can synch assignment from Schoology before a grade has been entered to allow staff, parents, and students access to more current class information.
View assignments that are past due or those due in the future.
Assignments from any of the student's sections may be listed, not just assignments in the current section or sections taught by the current teacher.
Click an assignment to view more information.
In-Progress Grades
The In-Progress Grades section displays grades for the student's courses in the current term.
Grades and progress through standards are shown below the summary.
Above the grades, the GPA, Credits, and Graduation Progress are displayed. Barrington 220 teachers should not be concerned Graduation shows as Off Track. Please review the GPS and credits earned.
Cumulative GPA values are found on the Grades tab. See the GPA Calculations in Campus for the actual calculation.
The Credit information indicates if the number of credits the student has earned out of the number required. This data is found on the student's transcript.
Progress towards graduation reports based on the Progress tab in Academic Planning.
Grades are listed by course. For grading tasks, the student's in-progress grade is shown for each task aligned to the course. For standards, a progress bar indicates the percentage of standards aligned to the course for which the student has a posted grade.
Click on a grade for a grading task to view a list of assignments and scores. Click the progress bar for a standard to view the standards for the course and the student's proficiency for each, whether in-progress or posted.
Attendance
The Attendance section can be filtered to show attendance totals for the year, the last 30 days, or the last 7 days. The total number of full day and period absences and of tardies display above the calendar. Full day absences are calculated using the whole/half day minutes entered on the calendar and do not follow state-specific attendance calculations.
Filter the calendar view by full day absences, period absences, or tardies. When filtered by absences, days are color-coded by excuse.
Attendance events display in the calendar and are color-coded.
Click an attendance event to view more information. If attendance letters have been sent to the student, a list of when letters were sent is shown. Letters cannot be viewed or generated from this tool.
Tips from the Techs
The holidays are approaching and the Barrington 220 Tech Team has gifted us all by sharing several tech tips you can use right now to increase your productivity or enhance your classroom experience!
Configure Your Menu Bar on Mac
by Charlie Parkinson
Don’t like the way your menu bar is configured? If you hold command while dragging the icons you can set it to your preference. Check out the video below.
Multitasking on iPad
by Kaitlyn Pankiewicz
Split View on the iPad will allow you to use multiple apps at the same time on one screen.
Below are instructions on how to use Split View.
Note: iPad must be in landscape view to use this.
Open an app (Safari, Mail, etc).
Open your dock by swiping up from the bottom of the screen.
When you see the dock, touch and hold the second app you want to open and drag it to the screen.
To add a Slide Over Screen
Open your dock (slide up from the bottom of the screen).
Drag the third app you want to use to the divider between the two apps.
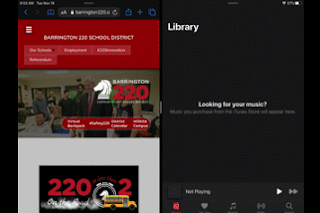
You can switch between multiple apps while Split View is activated. If you want to switch apps. You select the app and then slide it to the left or right.
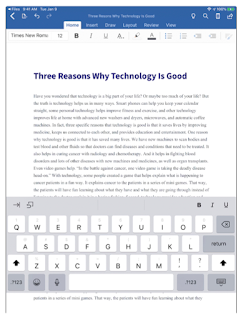
iPad Keyboard Tips
by Jason Bryant
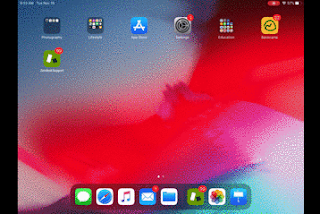
Apple offers three different positions for the iPad onscreen keyboard. Docked/Undocked, Floating, and Split.
To change your keyboard view, tap and hold the keyboard icon.
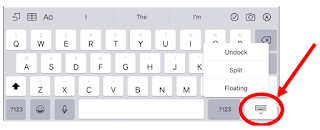
Split View looks like this: This is great for thumb typers.
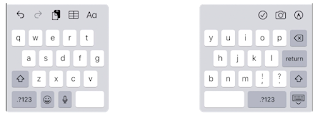
Floating Keyboard looks like this: This is useful if you use a Logitech Crayon or other stylus.

Undocked allows you to have the keyboard in the middle of the screen.
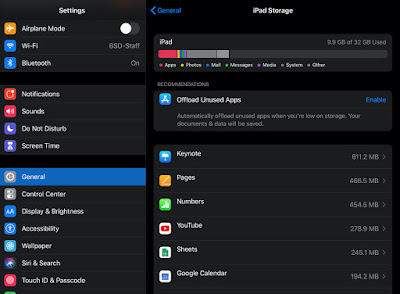
Free up Storage on Your iPad
by Justin Edge
Wondering what’s taking up all the space on your iPad?
Your iPad breaks down where all of your iPad space is being allocated to. To see this in a visual form, visit Settings > General > iPad Storage.
Here you will see a visual bar showing you where content is located on your iPad (Apps, Photos, Mail, etc). Below this bar the iPad will break down the largest applications on your iPad and sort them from largest to smallest.
Tapping on one of the apps will further break down the space being used and allow you to delete the app with a “Delete App” button.
Back Up Your Data to Your Google Drive on a Mac
by Bob Jensen
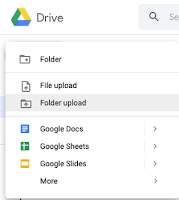
Log into your Google Drive. Once you are logged into your Google Drive select My Drive. Then tap the +New button.
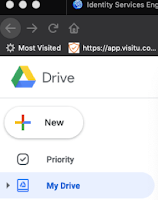
After you tap +New, select Upload File or Upload Folder.
When the next window opens, select the file or folder that you would like to back up to your Google Drive.
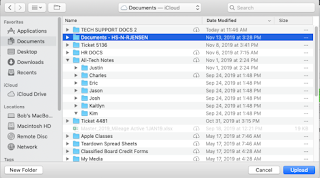
Click the Upload button.
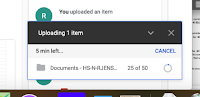
After clicking upload, a will screen pop-up showing progress the active upload.
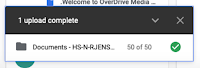
You will be notified by a message that the upload has completed.
Free Up Storage on Your Mac
by Josh Beatty

When you receive this message, how do you know what files are taking up all that space on your Mac’s hard drive? You have already emptied your trash and cleaned out your Downloads folder, but your drive is still mostly full. Luckily, there is a tool built into macOS that can help.
First look for Apple Menu in the upper left hand corner of your screen. Click on the Apple icon and select About This Mac from the drop down menu.

Once the About This Mac window opens click on Storage.

On the first screen you will see a color-coded status bar showing how much of your Mac’s hard drive is being used and how much space is being used by different types of files. To look a little deeper click on the Manage button.

In the Manage window there is a list of file types and the amount of space they are using in the left-side pane. If you click on one of file types you will see a list of the largest files of that type in the right pane If you click on one of the files you can use the Show in Finder button to see the location of the file or the Delete button to permanently delete the file.

One area that I always check is iOS Files. It may contain backups for old phones or iPads that you no longer have, or you may have inadvertently created a backup for an iOS device when plugging it into your Mac to charge. Those backups can be deleted here.

Prevent Apple TV Video Buffering
by Kim Martinez
Are you using an Apple TV and getting a message that videos are "buffering" (pausing, stopping, stuttering, etc.)? Try copying and pasting the URL link (web address) into Safari and then click on the AirPlay icon and select your Apple TV.
Customize the Finder Sidebar on Mac
by Eric Delgado
You've probably noticed all those folders and items on the left side of your Finder windows. (If not go to the Finder and from the View menu and select Show Sidebar). You can add your own folders to the Sidebar. Drag any folder to the side and that’s it. Now the cool part isn’t just that you now have one-click access to that folder, but anything you drop onto that folder will be copied or moved there.
Configure Your Menu Bar on Mac
by Charlie Parkinson
Don’t like the way your menu bar is configured? If you hold command while dragging the icons you can set it to your preference. Check out the video below.
Multitasking on iPad
by Kaitlyn Pankiewicz
Split View on the iPad will allow you to use multiple apps at the same time on one screen.
Below are instructions on how to use Split View.
Note: iPad must be in landscape view to use this.
Open an app (Safari, Mail, etc).
Open your dock by swiping up from the bottom of the screen.
When you see the dock, touch and hold the second app you want to open and drag it to the screen.

To add a Slide Over Screen
Open your dock (slide up from the bottom of the screen).
Drag the third app you want to use to the divider between the two apps.

You can switch between multiple apps while Split View is activated. If you want to switch apps. You select the app and then slide it to the left or right.

iPad Keyboard Tips
by Jason Bryant
Apple offers three different positions for the iPad onscreen keyboard. Docked/Undocked, Floating, and Split.
To change your keyboard view, tap and hold the keyboard icon.

Split View looks like this: This is great for thumb typers.

Floating Keyboard looks like this: This is useful if you use a Logitech Crayon or other stylus.

Undocked allows you to have the keyboard in the middle of the screen.

Free up Storage on Your iPad
by Justin Edge
Wondering what’s taking up all the space on your iPad?
Your iPad breaks down where all of your iPad space is being allocated to. To see this in a visual form, visit Settings > General > iPad Storage.
Here you will see a visual bar showing you where content is located on your iPad (Apps, Photos, Mail, etc). Below this bar the iPad will break down the largest applications on your iPad and sort them from largest to smallest.
Tapping on one of the apps will further break down the space being used and allow you to delete the app with a “Delete App” button.
Back Up Your Data to Your Google Drive on a Mac
by Bob Jensen
Log into your Google Drive. Once you are logged into your Google Drive select My Drive. Then tap the +New button.

After you tap +New, select Upload File or Upload Folder.

When the next window opens, select the file or folder that you would like to back up to your Google Drive.

Click the Upload button.
After clicking upload, a will screen pop-up showing progress the active upload.

You will be notified by a message that the upload has completed.

Free Up Storage on Your Mac
by Josh Beatty
When you receive this message, how do you know what files are taking up all that space on your Mac’s hard drive? You have already emptied your trash and cleaned out your Downloads folder, but your drive is still mostly full. Luckily, there is a tool built into macOS that can help.
First look for Apple Menu
in the upper left hand corner of your screen. Click on the Apple icon and select About This Mac from the drop down menu.Once the About This Mac window opens click on Storage.
On the first screen you will see a color-coded status bar showing how much of your Mac’s hard drive is being used and how much space is being used by different types of files. To look a little deeper click on the Manage button.
In the Manage window there is a list of file types and the amount of space they are using in the left-side pane. If you click on one of file types you will see a list of the largest files of that type in the right pane If you click on one of the files you can use the Show in Finder button to see the location of the file or the Delete button to permanently delete the file.
One area that I always check is iOS Files. It may contain backups for old phones or iPads that you no longer have, or you may have inadvertently created a backup for an iOS device when plugging it into your Mac to charge. Those backups can be deleted here.
Prevent Apple TV Video Buffering
by Kim Martinez
Are you using an Apple TV and getting a message that videos are "buffering" (pausing, stopping, stuttering, etc.)? Try copying and pasting the URL link (web address) into Safari and then click on the AirPlay icon and select your Apple TV.

Customize the Finder Sidebar on Mac
by Eric Delgado
You've probably noticed all those folders and items on the left side of your Finder windows. (If not go to the Finder and from the View menu and select Show Sidebar). You can add your own folders to the Sidebar. Drag any folder to the side and that’s it. Now the cool part isn’t just that you now have one-click access to that folder, but anything you drop onto that folder will be copied or moved there.
Thursday, November 7, 2019
Testing macOS Catalina Continues
On Tuesday, October 29, 2019, Apple released an update to macOS Catalina, its operating system for the
Mac. In Barrington 220, this upgrade mostly affects our MacBook Air laptops. Apple soon updated to version 10.15.1 after the initial release on October 7. Normally
a “dot 1” update of an operating system is a thumbs-up where most of the initial
bugs have been worked out and most people would feel free to upgrade
their OS. But as I mentioned last month, Catalina is a major shift for
macOS because it no longer supports older, 32-bit apps, and there are many, many 32-bit apps still in use.


The Technology Department has spent the
last several weeks testing all of the most common apps being used in Barrington 220. We’ve also solicited the assistance of a group of staff members who
have been testing the macOS for us as well. We’ve found that there are still a couple of important apps that need
some additional tweaking by the vendor before we are confident that they will
work reliably in the district. One app is
SMART Notebook which works with our SMART Boards. The other is an application
the Technology Department uses for certain technology support instances throughout the district.
Once those apps are fully updated, we will begin rolling out macOS 10.15 Catalina to all users. If you have questions about this upgrade, please contact us at x.1500.
Experiment with Something New
This is a guest post from Nancy Wadin, Teacher Librarian at Sunny Hill Elementary School.
To be effective, technology needs to be implemented in a thoughtful, student-centered way. Teachers are inspired to allow students more freedom to explore technologies and create something unexpected. Students need to be empowered to take responsibility for their learning and encouraged to stretch themselves to learn from other students’ work. In addition, students must be allowed an alternate time frame upon which to demonstrate their learning, as one of the benefits of technology use is to allow students to learn at their own pace and on their own schedules.
Three easy-to-use tools to explore are listed below. These are the tools that make sense in the classroom setting and also provide possibilities for a Blended Learning model, the use of which Barrington 220 is currently implementing.
 Nearpod is a technology tool that allows teachers to create presentations, embed activities to assess understanding within those presentations, and then share the presentations for students to do on their own or with their class. This tool could be used within a Blended Learning model, in which students could watch and respond in the Nearpod on their own schedule, with the feedback being reported to the teacher through the Reports feature. Or, it could be used in a classroom, with the responses of the students being seen immediately by the instructor and displayed for the other students. This would encourage engagement and increase the desire to respond appropriately.
 Screencasts are a great way to capture student thinking and encourage speaking fluency. Teachers can instruct using Flipgrid to prompt students to show video/photos of the work they have done and describe their learning. It allows students to make a recording which incorporates their photo(s), explains their thinking process, and uses tools to enhance their verbal description. Once it is posted, the teacher and other students can watch and make constructive suggestions. This app allows for feedback to the student while simultaneously gathering immediate assessment information for the teacher.
 Google Forms can be used to create quizzes or exit tickets. Use these forms to assess learning through the use of simple quizzes which could be altered based on accommodations for certain students. Use a QR code to share with students. Create exit tickets within Forms and quickly ascertain who has reached your learning objectives. At the same time, have students self-assess and be more reflective by asking them what they could do to improve—with the hope that they would accept greater responsibility for their learning.
These tools are just a small sample of the possibilities. If you haven’t already used one of these, try it this week. There are many more tools that are worth the investment of your time to find new ways to use technology with your students. Ask your Library/Technology Assistant (LTA), your Teacher Librarian, or your Instructional Digital Age Learning Coach (iDAL) coach if you are hoping to experiment with something new.
To be effective, technology needs to be implemented in a thoughtful, student-centered way. Teachers are inspired to allow students more freedom to explore technologies and create something unexpected. Students need to be empowered to take responsibility for their learning and encouraged to stretch themselves to learn from other students’ work. In addition, students must be allowed an alternate time frame upon which to demonstrate their learning, as one of the benefits of technology use is to allow students to learn at their own pace and on their own schedules.
Three easy-to-use tools to explore are listed below. These are the tools that make sense in the classroom setting and also provide possibilities for a Blended Learning model, the use of which Barrington 220 is currently implementing.
Nearpod is a technology tool that allows teachers to create presentations, embed activities to assess understanding within those presentations, and then share the presentations for students to do on their own or with their class. This tool could be used within a Blended Learning model, in which students could watch and respond in the Nearpod on their own schedule, with the feedback being reported to the teacher through the Reports feature. Or, it could be used in a classroom, with the responses of the students being seen immediately by the instructor and displayed for the other students. This would encourage engagement and increase the desire to respond appropriately. Screencasts are a great way to capture student thinking and encourage speaking fluency. Teachers can instruct using Flipgrid to prompt students to show video/photos of the work they have done and describe their learning. It allows students to make a recording which incorporates their photo(s), explains their thinking process, and uses tools to enhance their verbal description. Once it is posted, the teacher and other students can watch and make constructive suggestions. This app allows for feedback to the student while simultaneously gathering immediate assessment information for the teacher.Google Forms can be used to create quizzes or exit tickets. Use these forms to assess learning through the use of simple quizzes which could be altered based on accommodations for certain students. Use a QR code to share with students. Create exit tickets within Forms and quickly ascertain who has reached your learning objectives. At the same time, have students self-assess and be more reflective by asking them what they could do to improve—with the hope that they would accept greater responsibility for their learning. These tools are just a small sample of the possibilities. If you haven’t already used one of these, try it this week. There are many more tools that are worth the investment of your time to find new ways to use technology with your students. Ask your Library/Technology Assistant (LTA), your Teacher Librarian, or your Instructional Digital Age Learning Coach (iDAL) coach if you are hoping to experiment with something new.
What Story Are You Telling? A Case For Creativity in the Classroom
This year, Dr. Fuller and I have been collaborating on a YouTube series called Learning NOW in Barrington 220: One-minute Spotlight, a set of videos highlighting great examples of teachers effectively integrating technology into their instruction. Each week, we travel to a different classroom to observe, record footage, talk to students, and interview teachers. We then edit and publish a video on the Learning NOW YouTube channel. The experience has allowed me to visit many classrooms at all levels and flex my creativity muscle more than it has been flexed in a while.
Since we both produce videos for the series, it's important that we calibrate our formatting, style, and the specific shots for each video. Sometimes we will visit the same class at the same time and collect our own assets to use for the video. It was after one of these shared visits a few weeks ago that I realized one of the most important reasons for allowing students the space and time to be creative in their work. Dr. Fuller and I had both visited an elementary class for a literacy lesson that had students using iPad to record themselves reading so the teacher could later listen to each one. We each created our own versions of the video and watched them to see which one we would release for that week's episode. As we sat down to play each video Dr. Fuller quipped, "I can't wait to see what story you are telling."
What I realized in that moment was that although we had visited the same class, and the teacher and students were doing the same thing, we both came out with different stories. The story I was telling was shaped by my own experiences. It was shaped by the things I am most passionate about in learning, by my expertise in some areas and inexperience in others. As I moved around the room I was drawn to things that interested me and I failed to notice other things because they didn't seem important to me in the moment. Dr. Fuller had the same experience. His video was different than mine because his experiences and knowledge prior to making his video were different than mine. What emerged was two versions of the same experience. Seeing his video allowed me to see that class in a very different way. Our discussion afterward caused me to broaden my thinking, challenge my assumptions, and deepen my understanding of what I had observed.
Our students deserve this same type of experience. When we provide the chance for each student to put their personal spin on what they are learning it deepens their understanding. This is made more powerful by having the chance to share their story with others. Research and common sense tell us that we learn better when we are able to attach new learning to prior knowledge and experiences. This attachment is strengthened when we get a chance to build that connection for ourselves. Giving students the space and means to creatively develop these attachments based on their own life experiences ensures that new learning will develop deeper roots and stretch farther beyond the isolated lesson.
As you try to give your students more space to be creative, it's important to keep a few things in mind.
1. Start small.
One of the biggest obstacles to developing room for creative expression in most classes is the feeling that creativity involves a massive project that requires days, weeks, or months. You can start small by introducing the opportunity for creativity at any time in an existing lesson. The obvious way to do this is to allow some student choice in how they communicate their understanding. If the assessment for a learning session is a written assignment, why not allow students some alternatives like a video or photo essay? A less obvious way to create room for creativity is at the beginning of a lesson. Perhaps there is room to allow students some choice in what content they select. Often we balk at this idea because we are beholden to standards that don't seem to encourage this. But if the learning target is a skill or process target, there may be room for alternative choices.
2. Prepare to feel uncomfortable.
Any time I have tried something outside the conventions of "business as usual" in my class, I have felt the urge to bail on it 10-15 minutes into the lesson. I asked myself, "What were you thinking?" or, "They're not getting it, go back to the lecture," or I experienced other self-doubting sentiments. If you plan ahead and allow yourself to push through these thoughts, it is likely that the experience will be a good one. I've seen many teachers who were anxious to try a new approach because they felt the need to be the infallible expert to their students—that somehow, if a lesson doesn't work, their students would think less of them. Actually, this couldn't be further from the truth. Students respond positively to teachers who are modeling what real learning looks like, and that will likely involve failure. I have found that students connect with a teacher who is willing to be vulnerable and doesn't appear to have all the answers.
3. Expect students to push back.
As uncomfortable as you may be with this, your students may be more so. If they've been asked to "do school" for any number of years, they might really struggle when asked to think for themselves and make choices about their learning. Students who have been conditioned to show up, do what the teacher tells them, and get the grade will look at you like you're crazy or groan and roll their eyes when you first introduce a new idea. Recently, in a high school science class, students were asked to create a children's story that explained cellular respiration. As the teacher explained the assignment, she saw that students were defaulting to basic stories on familiar formats. She really had to push them to get them to be creative. By the end, students were using Green Screen apps to shoot videos, writing songs, and creating many other outstanding projects. The students clearly enjoyed the experience and are now more prepared for this the next opportunity. Resist the urge to bail on a creative idea simply because your students push back. Students may simply be doing what they have been conditioned to do. If you recondition them, they will likely become better at creative expression.
4. Create a routine for creativity.
The more opportunities you provide for creativity in your class, the more comfortable you and your students will be with it. If you try this once and never go back to it because you feels like it failed, you will be missing current and future opportunities. You and your students need time to develop this as a habit. It sounds counterintuitive, but the more routine that creativity becomes, the more creative your students will be, and the more willing they will be to stretch themselves.
Since we both produce videos for the series, it's important that we calibrate our formatting, style, and the specific shots for each video. Sometimes we will visit the same class at the same time and collect our own assets to use for the video. It was after one of these shared visits a few weeks ago that I realized one of the most important reasons for allowing students the space and time to be creative in their work. Dr. Fuller and I had both visited an elementary class for a literacy lesson that had students using iPad to record themselves reading so the teacher could later listen to each one. We each created our own versions of the video and watched them to see which one we would release for that week's episode. As we sat down to play each video Dr. Fuller quipped, "I can't wait to see what story you are telling."
 |
| A student at Lines Elementary engages in a creative activity using Logitech Crayon on iPad. |
Our students deserve this same type of experience. When we provide the chance for each student to put their personal spin on what they are learning it deepens their understanding. This is made more powerful by having the chance to share their story with others. Research and common sense tell us that we learn better when we are able to attach new learning to prior knowledge and experiences. This attachment is strengthened when we get a chance to build that connection for ourselves. Giving students the space and means to creatively develop these attachments based on their own life experiences ensures that new learning will develop deeper roots and stretch farther beyond the isolated lesson.
As you try to give your students more space to be creative, it's important to keep a few things in mind.
1. Start small.
One of the biggest obstacles to developing room for creative expression in most classes is the feeling that creativity involves a massive project that requires days, weeks, or months. You can start small by introducing the opportunity for creativity at any time in an existing lesson. The obvious way to do this is to allow some student choice in how they communicate their understanding. If the assessment for a learning session is a written assignment, why not allow students some alternatives like a video or photo essay? A less obvious way to create room for creativity is at the beginning of a lesson. Perhaps there is room to allow students some choice in what content they select. Often we balk at this idea because we are beholden to standards that don't seem to encourage this. But if the learning target is a skill or process target, there may be room for alternative choices.
2. Prepare to feel uncomfortable.
Any time I have tried something outside the conventions of "business as usual" in my class, I have felt the urge to bail on it 10-15 minutes into the lesson. I asked myself, "What were you thinking?" or, "They're not getting it, go back to the lecture," or I experienced other self-doubting sentiments. If you plan ahead and allow yourself to push through these thoughts, it is likely that the experience will be a good one. I've seen many teachers who were anxious to try a new approach because they felt the need to be the infallible expert to their students—that somehow, if a lesson doesn't work, their students would think less of them. Actually, this couldn't be further from the truth. Students respond positively to teachers who are modeling what real learning looks like, and that will likely involve failure. I have found that students connect with a teacher who is willing to be vulnerable and doesn't appear to have all the answers.
3. Expect students to push back.
As uncomfortable as you may be with this, your students may be more so. If they've been asked to "do school" for any number of years, they might really struggle when asked to think for themselves and make choices about their learning. Students who have been conditioned to show up, do what the teacher tells them, and get the grade will look at you like you're crazy or groan and roll their eyes when you first introduce a new idea. Recently, in a high school science class, students were asked to create a children's story that explained cellular respiration. As the teacher explained the assignment, she saw that students were defaulting to basic stories on familiar formats. She really had to push them to get them to be creative. By the end, students were using Green Screen apps to shoot videos, writing songs, and creating many other outstanding projects. The students clearly enjoyed the experience and are now more prepared for this the next opportunity. Resist the urge to bail on a creative idea simply because your students push back. Students may simply be doing what they have been conditioned to do. If you recondition them, they will likely become better at creative expression.
4. Create a routine for creativity.
The more opportunities you provide for creativity in your class, the more comfortable you and your students will be with it. If you try this once and never go back to it because you feels like it failed, you will be missing current and future opportunities. You and your students need time to develop this as a habit. It sounds counterintuitive, but the more routine that creativity becomes, the more creative your students will be, and the more willing they will be to stretch themselves.
Wednesday, November 6, 2019
BMS-Prairie Shares Ideas for Using Video in the Classroom
For our second installment of the #bsd220tech monthly feature, Share Your Best, BMS-Prairie Campus has dominated the returns! Library/Technology Assistant Ruth Kinkley and math teacher Ashley Sword will each receive an extremely limited-edition and highly sought-after prize, and you will benefit from two new tips about using video in your classroom. THANK YOU to our contributors! Here are the tips:
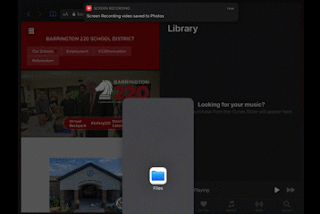
Library/Technology Assistant Ruth Kinkley at BMS-Prairie shared some excellent ideas about using the Screen Recording feature that is built into the iPad in Settings > Control Center > Customize Controls. You can then add Screen Recording from the list below under MORE CONROLS by clicking the green +. Ruth states:
Library/Technology Assistant Ruth Kinkley at BMS-Prairie shared some excellent ideas about using the Screen Recording feature that is built into the iPad in Settings > Control Center > Customize Controls. You can then add Screen Recording from the list below under MORE CONROLS by clicking the green +. Ruth states:
Screen recording on iOS devices is a helpful tool to create video tutorials for students or teammates. We have found that our students have also used screen recording in their classrooms for projects and demonstrations. For a list of detailed instructions on iPad Screen Recording, click here:BMS-Prairie math teacher Ashley Sword shared her experiences using the popular video app Flipgrid that allows students to “record short, authentic videos based on your topics.” Ashley reports:
https://support.apple.com/en-us/HT207935Once you have enabled Screen recording in your settings, it's as easy as swiping down from the upper-right corner of the screen to begin your project.
I have used Flipgrid in the math classroom for students to explain their thought process as they solve a problem. I have also had students create their own real-world problems and explain using Flipgrid how to solve it to their peers. The students enjoy the fun stickers they can add to their finished product! Flipgrid is extremely user-friendly!Each month we will ask Barrington 220 staff to Share Your Best tip, trick, or tactic for a different topic. For the next issue, we are asking you to share tips, tricks, or tactics for using Apple Classroom.
Tuesday, November 5, 2019
A Brief Introduction to Sketchnoting
During the past two months, I have had the opportunity to work with a variety of teachers and administrators on the visual note-taking technique of sketchnoting. One well-known sketchnoter in the world of education, Sylvia Duckworth, defines sketchnoting as "a form of visual note-taking where you draw or doodle your thoughts, observations, or notes in combination with words or text" (2018). Duckworth goes on to clarify that sketchnoting is not art, but a way to "document your thought process."

I wholeheartedly agree that the benefits of sketchnoting are about the process of this style of note-taking and not necessarily the product. That being said, I have observed that the more sketchnotes I personally create, the more artistic they become. My more "artistic" sketchnotes did not happen overnight or by chance. In fact, it took 10–20 sketchnoting examples over a period of about a year for me to feel that I had developed a style. However, I have felt the note-taking benefits of the process since the very first sketchnote I attempted.
Research provides many potential benefits for sketchnoting including retention of information, comprehension, making connections, visualizing learning, and increased motivation, and engagement (Duckworth, 2018, and others). Below is a short list of studies on the topic of sketchnoting.
The training session I offer is designed to help someone try sketchnoting for the first time. In Barrington 220, all teachers and students have access to iPad, the free Keynote for iOS app, and a Logitech Crayon. While many other apps are available for sketchnoting, I choose Keynote because it is useful for more than just sketchnoting, allows quick access to a large basic clip art library (tap + in the upper-right corner > tap the shapes tab), and allows sketchnotes to be easily “played back” using the Line Draw Animation.
Access the Keynote files for this training here: bit.ly/220fullersketchnote

Here is a brief description of the session:
After a short introduction to sketchnoting, participants draw four simple shapes and then pass their iPad to other participants to help complete simple drawing tasks. Next, we create stylized text drawings. We then discuss the idea that a single, simple drawing can describe multiple ideas, i.e., a lightbulb can mean "light," "idea," "creativity," "imagination," and other things. After a brief discussion about organizational structures, we watch a short TED talk and try our own sketchnote. Finally, we debrief about the sketchnote experience and share some of what we learned about the process.
Having completed many sketchnotes, I like to remind participants that sketchnoting presentations of shorter duration may be more difficult than sketchnoting longer talks. Shorter presentations likely have less content for note-taking than longer presentations, but the 9.7-inch screen is the same size for both. Although there is no rule that you need to fill the full space or even use just one blank slide, traditional sketchnotes fill a single "page." Further, a longer presentation likely forces the sketchnoter to further synthesize the information and/or be more selective about what gets captured.
Please feel free to use these materials in a small or large group...or invite me (or someone who has taken this session) to deliver it in your school or group. If I have learned anything about sketchnoting, it’s that the only way to become proficient at it and realize its maximum benefits...is to do more sketchnoting.
REFERENCES & RESOURCES
Book
Duckworth, Sylvia. (2018). How to Sketchnote: A Step-by-Step Manual for Teachers and Students. Elevate Books Edu. Kindle Edition. https://sylviaduckworth.com/how-to-sketchnote-a-step-by-step-manual/
Short TED Talks
Duckworth, Angela Lee. (2013). Grit: The power of passion and perseverance (6:02). https://www.ted.com/talks/angela_lee_duckworth_grit_the_power_of_passion_and_perseverance
Musallam, Ramsey. (2013). 3 rules to spark learning (6:18). https://www.ted.com/talks/ramsey_musallam_3_rules_to_spark_learning?language=en
Emdin, Christopher. (2013). Teach teachers how to create magic (6:43). https://www.ted.com/talks/christopher_emdin_teach_teachers_how_to_create_magic
Other References
Hayward, Kate. (2016). Draw like a child, see like a master. TEDxSanAntonio. Retrieved from www.youtube.com/watch?v=ZA92l6KwuT4&feature=youtu.be&t=13m8s
Knezel, S. (2016). The Power of Visual Notetaking. Retrieved from www.edweek.org/tm/articles/2016/12/28/the-power-of-visual-notetaking.html
Schwartz, K. (2015). Making Learning Visible: Doodling Helps Memories Stick. Retrieved from www.kqed.org/mindshift/39941/making-learning-visible-doodling-helps-memories-stick
Thomas, N.J.T. (2014). Dual Coding and Common Coding Theories of Memory. Stanford Encyclopedia of Philosophy. Retrieved from https://plato.stanford.edu/entries/mental-imagery/theories-memory.html
Blank Versions of This Apple Keynote Presentation
Fuller, Matt J. (2019). A brief intro to sketchnoting (teacher and student versions). Retrieved from bit.ly/220fullersketchnote

I wholeheartedly agree that the benefits of sketchnoting are about the process of this style of note-taking and not necessarily the product. That being said, I have observed that the more sketchnotes I personally create, the more artistic they become. My more "artistic" sketchnotes did not happen overnight or by chance. In fact, it took 10–20 sketchnoting examples over a period of about a year for me to feel that I had developed a style. However, I have felt the note-taking benefits of the process since the very first sketchnote I attempted.
Research provides many potential benefits for sketchnoting including retention of information, comprehension, making connections, visualizing learning, and increased motivation, and engagement (Duckworth, 2018, and others). Below is a short list of studies on the topic of sketchnoting.
The training session I offer is designed to help someone try sketchnoting for the first time. In Barrington 220, all teachers and students have access to iPad, the free Keynote for iOS app, and a Logitech Crayon. While many other apps are available for sketchnoting, I choose Keynote because it is useful for more than just sketchnoting, allows quick access to a large basic clip art library (tap + in the upper-right corner > tap the shapes tab), and allows sketchnotes to be easily “played back” using the Line Draw Animation.
Access the Keynote files for this training here: bit.ly/220fullersketchnote

Here is a brief description of the session:
After a short introduction to sketchnoting, participants draw four simple shapes and then pass their iPad to other participants to help complete simple drawing tasks. Next, we create stylized text drawings. We then discuss the idea that a single, simple drawing can describe multiple ideas, i.e., a lightbulb can mean "light," "idea," "creativity," "imagination," and other things. After a brief discussion about organizational structures, we watch a short TED talk and try our own sketchnote. Finally, we debrief about the sketchnote experience and share some of what we learned about the process.
 |
| Barrington High School teachers learn about sketchnoting in a recent session. |
Please feel free to use these materials in a small or large group...or invite me (or someone who has taken this session) to deliver it in your school or group. If I have learned anything about sketchnoting, it’s that the only way to become proficient at it and realize its maximum benefits...is to do more sketchnoting.
REFERENCES & RESOURCES
Book
Duckworth, Sylvia. (2018). How to Sketchnote: A Step-by-Step Manual for Teachers and Students. Elevate Books Edu. Kindle Edition. https://sylviaduckworth.com/how-to-sketchnote-a-step-by-step-manual/
Short TED Talks
Duckworth, Angela Lee. (2013). Grit: The power of passion and perseverance (6:02). https://www.ted.com/talks/angela_lee_duckworth_grit_the_power_of_passion_and_perseverance
Musallam, Ramsey. (2013). 3 rules to spark learning (6:18). https://www.ted.com/talks/ramsey_musallam_3_rules_to_spark_learning?language=en
Emdin, Christopher. (2013). Teach teachers how to create magic (6:43). https://www.ted.com/talks/christopher_emdin_teach_teachers_how_to_create_magic
Other References
Hayward, Kate. (2016). Draw like a child, see like a master. TEDxSanAntonio. Retrieved from www.youtube.com/watch?v=ZA92l6KwuT4&feature=youtu.be&t=13m8s
Knezel, S. (2016). The Power of Visual Notetaking. Retrieved from www.edweek.org/tm/articles/2016/12/28/the-power-of-visual-notetaking.html
Schwartz, K. (2015). Making Learning Visible: Doodling Helps Memories Stick. Retrieved from www.kqed.org/mindshift/39941/making-learning-visible-doodling-helps-memories-stick
Thomas, N.J.T. (2014). Dual Coding and Common Coding Theories of Memory. Stanford Encyclopedia of Philosophy. Retrieved from https://plato.stanford.edu/entries/mental-imagery/theories-memory.html
Blank Versions of This Apple Keynote Presentation
Fuller, Matt J. (2019). A brief intro to sketchnoting (teacher and student versions). Retrieved from bit.ly/220fullersketchnote
Subscribe to:
Posts (Atom)
Popular Recent Posts
-
 One of the new additions to our One to World program for 2019-20 is the availability of Logitech Crayon devices for all Barrington 220 stud...
 -
 For many different reasons, change has come to our talented team of Library Technology Assistants. It was hard to say goodbye to our retiree...