

by Troy Jones
 by Jay Quintana
To perform the Quick Look action, click to select your file and tap the spacebar once. For example, in the Finder you can select a download and hit the spacebar to quickly scan the content of a PDF without needing to open it. The type of preview you are able to view will depend on the file. For a document or image, you will be able to fully view the content of the file as shown below. If it is a folder, you will only see the file name, file size, and last modified date.
Use Spaces on macOS
To do so, press the F3 key on your keyboard. This will allow you to choose among current Spaces and add any additional Spaces.
Move between Spaces by:
1. Pressing control + left/right arrow keys.
2. Three-finger swipe (left/right) on the trackpad.
Delete a Space:
Press F3 & hover over the Space you desire, click on the X to remove.
Please Note: When you work in a space, only the windows that are in that space are shown.
Use Stacks in macOS

Once you Use Stacks, your desktop will look like this:

If you would like to disable Stacks, simply right click on your desktop and select “Use Stacks” again. This will uncheck the selection and place all your files back onto your desktop.
Quickly Resize a New Window in macOS
Here are some ways to customize your dock to enable better visibility and productivity.
Go to System Settings > Desktop & Dock
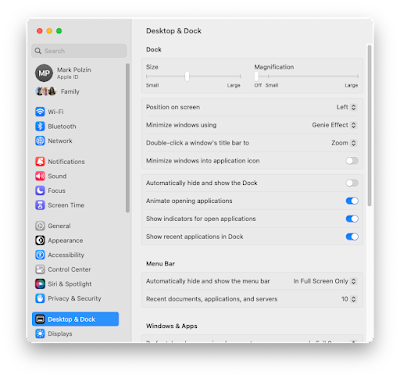
Size—Enables user to make the dock smaller or bigger.
Magnification—Enlarges any icon in the dock to the magnification level set when the mouse pointer hovers it.
Position on screen—Change the location of your dock on your homescreen to the left, right, or bottom.
Minimize windows using—Can choose the visual effect when you minimize a window (Genie Effect or Scale Effect).
Double-click a window’s title bar—Choose what happens when you double-click the title bar of your browser window or application. You can choose to Minimize the browser or application to the dock or have it Zoom which causes the browser or application to fill the whole screen and the last option is to have the browser or application window do nothing.
Minimize windows into application icon—This sets what happens when you minimize a browser window or application. If it’s set to off, it will minimize to an area in the dock, if it’s set to on, it will minimize to the corresponding browser or window in the dock.
Automatically hide and show the Dock—When enabled, the dock will disappear when your mouse is not hovered over it. When disabled, the dock will show at all times.
Animate opening applications—When enabled, the icon chosen in the dock will bounce.
Show indicators for open applications—When enabled, a small white dot below an icon in the dock will show which applications are open.
Show recent application in Dock—When enabled, it will show the most recently opened apps at the right end of the dock.
View Files with Quick Look on Your Mac
Go to System Settings > Desktop & Dock
Size—Enables user to make the dock smaller or bigger.
Magnification—Enlarges any icon in the dock to the magnification level set when the mouse pointer hovers it.
Position on screen—Change the location of your dock on your homescreen to the left, right, or bottom.
Minimize windows using—Can choose the visual effect when you minimize a window (Genie Effect or Scale Effect).
Double-click a window’s title bar—Choose what happens when you double-click the title bar of your browser window or application. You can choose to Minimize the browser or application to the dock or have it Zoom which causes the browser or application to fill the whole screen and the last option is to have the browser or application window do nothing.
Minimize windows into application icon—This sets what happens when you minimize a browser window or application. If it’s set to off, it will minimize to an area in the dock, if it’s set to on, it will minimize to the corresponding browser or window in the dock.
Automatically hide and show the Dock—When enabled, the dock will disappear when your mouse is not hovered over it. When disabled, the dock will show at all times.
Animate opening applications—When enabled, the icon chosen in the dock will bounce.
Show indicators for open applications—When enabled, a small white dot below an icon in the dock will show which applications are open.
Show recent application in Dock—When enabled, it will show the most recently opened apps at the right end of the dock.
View Files with Quick Look on Your Mac
by Jay QuintanaTo perform the Quick Look action, click to select your file and tap the spacebar once. For example, in the Finder you can select a download and hit the spacebar to quickly scan the content of a PDF without needing to open it. The type of preview you are able to view will depend on the file. For a document or image, you will be able to fully view the content of the file as shown below. If it is a folder, you will only see the file name, file size, and last modified date.
Use Spaces on macOS
by Eric Delgado
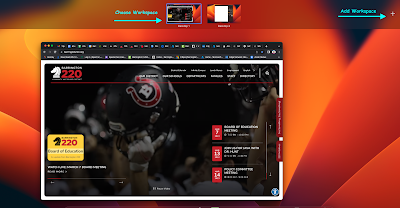
Working on multiple windows? Does it look like this?

Working on multiple windows? Does it look like this?
By adding Spaces, you can organize and focus on individual projects as desired! You can add up to 16 Spaces.
To do so, press the F3 key on your keyboard. This will allow you to choose among current Spaces and add any additional Spaces.
Move between Spaces by:
1. Pressing control + left/right arrow keys.
2. Three-finger swipe (left/right) on the trackpad.
Delete a Space:
Press F3 & hover over the Space you desire, click on the X to remove.
Please Note: When you work in a space, only the windows that are in that space are shown.
Use Stacks in macOS
by Justin Edge
Does your Desktop look like this?
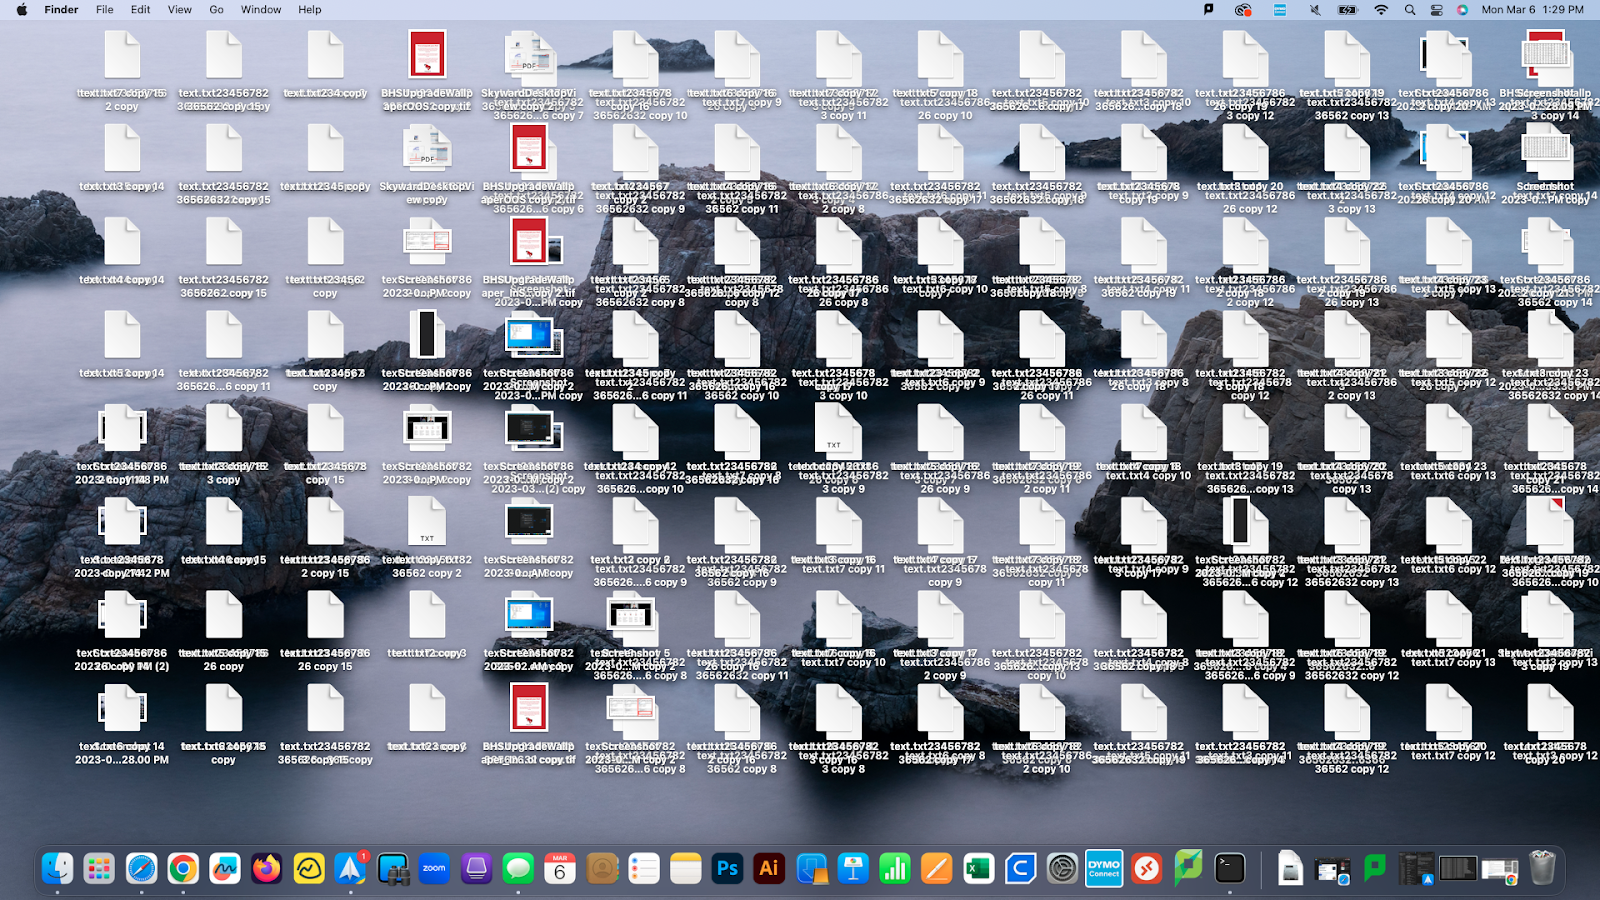
Use Stacks in MacOS to group common file types into easy to access folders that remain on your desktop. To enable stacks, right click (two finger click) on your trackpad. Then Select “Use Stacks"
Does your Desktop look like this?
Use Stacks in MacOS to group common file types into easy to access folders that remain on your desktop. To enable stacks, right click (two finger click) on your trackpad. Then Select “Use Stacks"
Once you Use Stacks, your desktop will look like this:
If you would like to disable Stacks, simply right click on your desktop and select “Use Stacks” again. This will uncheck the selection and place all your files back onto your desktop.
Quickly Resize a New Window in macOS
by Jake Benz
1. Hover cursor over top banner of the Window.
2. Double click banner to resize to full screen.
3. Double click banner again to resize back to original window size.
Force Quit an App in macOS
1. Hover cursor over top banner of the Window.
2. Double click banner to resize to full screen.
3. Double click banner again to resize back to original window size.
by Peter Chang
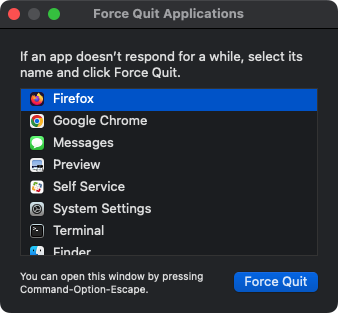
If an app on your Mac is frozen, or not responding, you can force the app to quit:
If an app on your Mac is frozen, or not responding, you can force the app to quit:
Press these three keys together: Command+Option+Esc. (Or you can click on the Apple symbol in the upper left corner and select Force Quit...)
A Force Quit Applications window appears. Select the app you want to quit. Click Force Quit.
Media Request Tips
Media Request Tips
by Bob Jensen
Most times when there is a media request for audio visual equipment, the start time is after normal school hours. The Tech Team will set-up the requested equipment, just prior to, or immediately after, the daily dismissal bell rings, depending on the location of the equipment set-up.
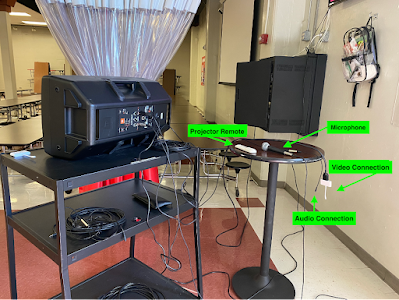
For example, the Tech Team receives many requests for a speaker, a projector, and a microphone to be set-up in a student cafeteria. A typical set-up in a cafeteria will look like this:
Most times when there is a media request for audio visual equipment, the start time is after normal school hours. The Tech Team will set-up the requested equipment, just prior to, or immediately after, the daily dismissal bell rings, depending on the location of the equipment set-up.
For example, the Tech Team receives many requests for a speaker, a projector, and a microphone to be set-up in a student cafeteria. A typical set-up in a cafeteria will look like this:
After the Tech Team sets up and tests all connections, they will power off all of the devices.
If you will be using a projector: Upon your arrival, you will need to power on the projector with the remote. You will connect your device (laptop or iPad) to the projector via the supplied dongle. If your presentation has sound, you will need to connect the audio connection to your device’s headphone jack.
Next you will need to power on the speaker.
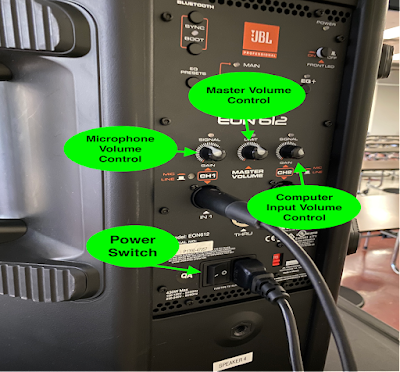
Volume can be controlled by the master volume control. The volume for either the microphone or the computer can be adjusted by using the corresponding volume controls.
At the end of your event, please power off all of the equipment.
The Tech Team will retrieve the equipment the following morning.
Next you will need to power on the speaker.
Volume can be controlled by the master volume control. The volume for either the microphone or the computer can be adjusted by using the corresponding volume controls.
At the end of your event, please power off all of the equipment.
The Tech Team will retrieve the equipment the following morning.


No comments:
Post a Comment